First Desktop Project
Creating a project with the Tellusim Core SDK is simple because you do not need any external dependencies to start working.
You can download the SDK from the official GitHub repository:
git clone https://github.com/Tellusim/Tellusim_Core_SDK.git
This command will clone the latest Tellusim Core SDK repository locally.
The repository is always maintained in a stable state, while platform-specific prebuilt binaries are provided through dedicated branches.
Choosing a Branch
Each branch contains the same unified source code, along with prebuilt binaries and project files for a specific platform.
| Platform | Branch |
|---|---|
| Windows x64 | git checkout windows_x64 |
| Windows arm64 | git checkout windows_arm64 |
| Linux x64 | git checkout linux_x64 |
| Linux arm64 | git checkout linux_arm64 |
| macOS x64 | git checkout macos_x64 |
| macOS arm64 | git checkout macos_arm64 |
| Android | git checkout android |
| iOS | git checkout ios |
| tvOS | git checkout tvos |
| Web | git checkout emscripten |
Switching branches only changes which prebuilt binaries are included.
The source code remains the same. All branches are kept stable.
System Requirements
The Tellusim Core SDK supports modern graphics APIs and includes compatibility layers for older platforms such as Direct3D11, OpenGLES, and WebGL.
This allows applications to run on both high-end systems and embedded devices.
Supported build systems include:
- CMake, GNU Make, nmake.exe, Visual Studio (*.vcxproj) - for C++ projects
- C# project files (*.csproj) - for C# projects
- Xcode (*.xcodeproj) - for macOS/iOS/tvOS projects
- Gradle - for Java/Android projects
- Cargo - for Rust projects
Folder Layout
After downloading the SDK, you will see:
bin/- tools and utilitiesinclude/- C++ headerslib/- platform-specific libraries (Debug/Release)build/- Makefile-based (GNU make/nmake.exe) build systemsamples/- minimal and advanced sample projectsplugins/- SDK plugins with full source codetools/- SDK tools with full source code
Release and Debug builds provide comparable runtime performance.
Debug libraries include additional assertions and ship with PDB symbols for easier debugging.
For development, it is recommended to use the Debug libraries, as they help detect common mistakes early.
Environment Setup
It is recommended to add the bin/ directory to your PATH environment variable.
This simplifies running SDK tools and build scripts from any location.
Optionally, you can create a TSROOT environment variable with the full path to the SDK.
Languages Support
Language support for C#, Rust, Swift, Java, JavaScript, and Python is provided in the plugins/binding directory.
These bindings expose the full SDK functionality and are optimized for each language.
Setting Up Your C++ Project
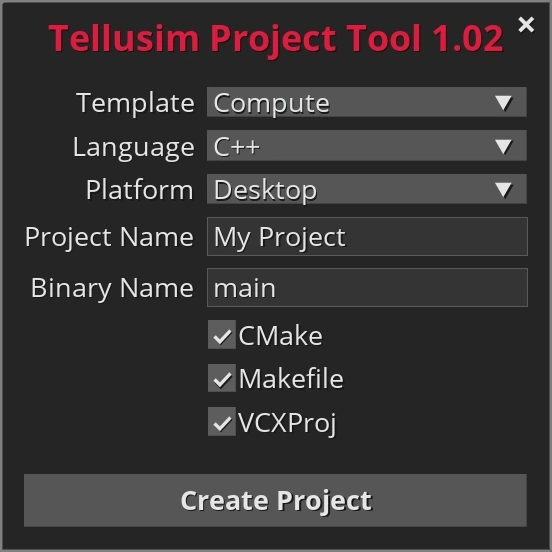
The simplest way to create a new project is to use the Project Generation Tool.
The Project Generation Tool provides templates for:
- Core - a base application with an optional "hello triangle" output.
- Compute - a base application for simple compute-shader development.
- Fragment - a base application for simple fragment-shader development.
- Canvas - Canvas-based application (2D games and tools).
Depending on your project layout, you can choose one of the following modes:
- Project outside the SDK directory - required resources are copied into your project. After SDK upgrades, you must manually copy updated resources if needed.
- Project inside the SDK directory - shares all SDK resources automatically. SDK upgrades are applied automatically.
The Project Generation Tool supports both GUI and command-line interface modes.
For simplicity, we will use the GUI mode.
Please run the bin/ts_project binary without any command-line arguments and set up the required parameters:
You can also run the Project Generation Tool from the SDK Browser.
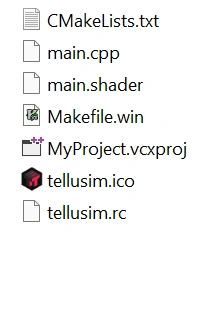
Pressing Create Project will open a target directory selection dialog where your project will be located:
Outside SDK directory:
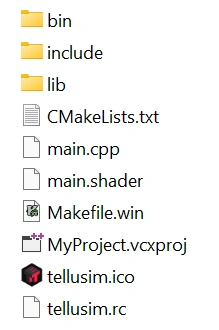

Inside SDK directory:
Time to build the project with:
- Visual Studio:
OpenMy Project.vcxproj, build, and run. - MSBuild:
mkbuild.exe "My Project.vcxproj"
x64/Debug/maind_x64.exe - CMake:
mkdir build
cd build
cmake.exe ..
start ALL_TARGETS.vcxproj - Nmake:
nmake.exe -f Makefile.winNmakeYou can also use
bin/make_x64.batinstead ofnmake.exe -f Makefile.win. It is recommended to runbin/vcvars_x64.batat the start of your console session to initialize the compiler environment. This will reduce the time required to build the project.
The VCXProj option is available on all platforms for cross-platform development.
Other Language Projects
C# Project
Choose C# in the Project Generation Tool, then open My Project.csproj, build, and run.
On Linux and macOS, a GNU Makefile is also generated:
make
make run
The C# binding depends on the C-language binding plugin.
Rust Project
Choose Rust in the Project Generation Tool:
cargo build
cargo run
Rust binding depends on the C-language binding plugin.
Java Project
Choose Java in the Project Generation Tool:
gradlew build
gradlew run
The Java binding is standalone and does not require other bindings.
Swift Project
Choose Swift in the Project Generation Tool:
swift build
swift run
Swift language binding is standalone, requires the Objective-C runtime, and is only compatible with Apple devices.
Python Project
Choose Python in the Project Generation Tool, then run the generated main.py file.
Python runtime must be able to load tellusim.so or tellusim.pyd files.
See the Readme.txt in the Python bindings folder for details.
Your Python runtime may not match the runtime of the prebuilt binaries.
To rebuild the Python bindings, open the plugins/binding/python/ directory and run:
make # for Linux/macOS
nmake.exe -f Makefile.win # for Windows
To build a Release library, use:
make debug=0 # for Linux/macOS
nmake.exe -f Makefile.win debug=0 # for Windows
After building or installing the Python bindings, verify that everything works by running:
python3 -c "import tellusimd; print(tellusimd.App.getVersion())"
Ensure that the generated .so or .pyd file is in the same folder as your main.py or accessible in your Python path.
This command will import the Tellusim Python module and print the SDK version, confirming that your Python runtime matches the compiled binaries.